Unity3D allows developers to create 2D and 3D interfaces. In this tutorial I will be explaining how to set up a simple GUI (graphical user interface) or HUD (heads up display), which shows the lives/score of a player. There are currently several 3rd party UI building solutions for Unity, such as Autodesk’s ScaleForm or UniSWF. Both of these 3rd part solutions use Adobe Flash to create the UI elements, and are said to be quite intuitive, although I haven’t yet had the opportunity to try them myself. Although it should be noted that their is a good reason such 3rd party tools exist, as at the time of this tutorial, 2d interface and menu systems in Unity leave much to be desired…
Step 1: Create some HUD assets
Using your favourite graphics tool such as Photshop, create the assets you would like to bring into your game.
It’s nice to create some kind of backing for the text to sit on top to make it easy to read. Making sure the backing graphic doesn’t clash with the underlaying graphic styles in your game, It should stand out, and be easy to identify.
The game I am using this menu in is a marble game where the player rolls around picking up gems. So I want to track the players lives (marbles) and how many gems have been collected.
When your graphics are completed Export them individually as PNGs on a transparent background (pngs retains transparency and are lossless). Give your files meaningful names. Mine are named gui_balls.png and gui_gems.png
*Note – Adding a slight drop shadow can be a nice way to make your graphics stand out.
Step 2: Bring your assets into Unity3D
Open your existing project, or create a new one. In your project tab create a folder called ‘GUI’ and drag in your new graphic files.
Step 3: Create a GUI Texture
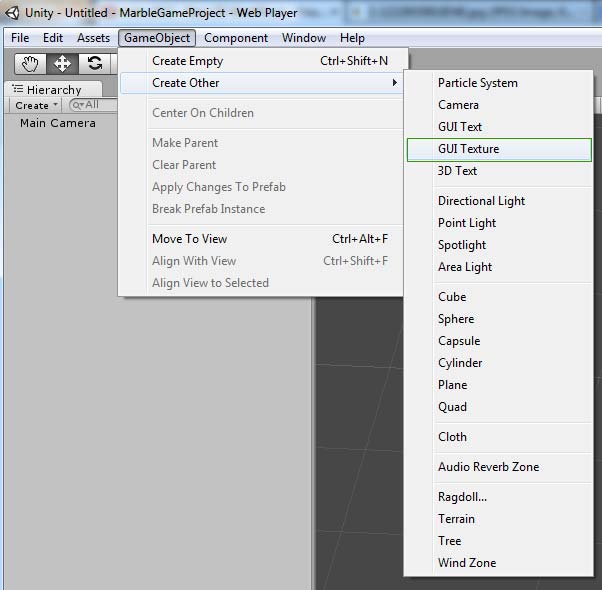
In Unity3D, 2D elements must be added to the scene just like any other game object. Go to and select GameObject > Create Other > GUI Texture
Once you do this, Unity will by default add the Unity logo to the game scene, If you click the ‘Game’ tab you should now see the Unity3D logo in the center of the screen. You will also notice that ‘UnityWatermark-small’ has been added to the Hierarchy window.
Step4: Assign a texture to the GUI Texture object
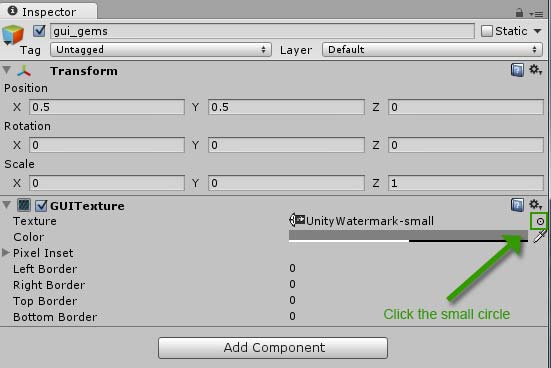
Next order of business is to rename the object to something more suitable, change the object name in the inspector panel and hit Enter. I will give my GUI texture object the same name as my image file, ‘gui_gems’.
Now we need to assign the correct texture to our GUI texture, you can do this by selecting the small circle icon in the inspector to the right of the texture info.
This will bring up the ‘Select Texture’ panel which should list a variety of default Unity textures as well as your own. Find your image and select it, or if you can’t see it, type the first few letters of your image names (this is why nice naming conventions help, if like me you named your image ‘gui_something’ you could now see all the gui items just by typing ‘gui’ – this can be really helpful in a massive project with many GUI items).
Now jump to your ‘Game’ tab you will see the texture has updated. Nice!
Step5: Add Some Text
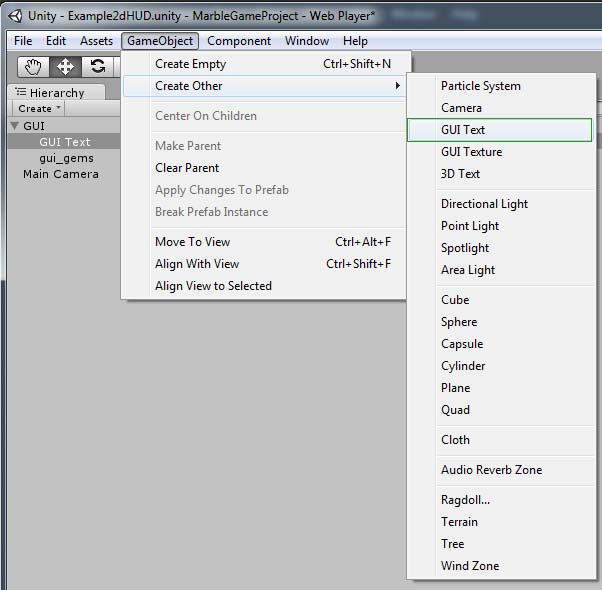
Create a ‘GUI Text’ object just like we did with the ‘GUI texture’ object, by going to GameObject> Create Other > GUI Text
Rename the the object to something appropriate, I am naming mine ‘guiText_gems’.
With your guiText object selected, you will see the ‘Inspector panel’ has a lot of useful info and options. The default text is ‘Gui text’ change it to whatever you like. Also change the font size to about 20, and change your font colour so it is not the same colour as your backing.
If you switch to your ‘Game tab’ you will see that there is an issue…. the text is behind the graphic. This demonstrate how finicky the 2D ui process in Unity will become. To fix this you need to change the Z position of the Gui Text, this is not to be done in the 3d view as its very sensitive and you can easily move your text out of the game scene by just moving it 1 cm on screen. Instead change the Z position in the inspector to be .1 more than the graphic. eg if your backing graphic has the z coordinates of 100, change the text z coordinates to be 100.1
Once the text is in front of the graphic, alter the ‘Pixel Offset’ properties in of the text in the inspector to fine tune your positioning.
Step 6: Changing the font
The default font used is Arial. If you want to use a custom font you need to a copy of the font file (another annoying obstacle). you can take fonts from the windows folder or use a site like dafont to download free font files. Just add a folder called ‘fonts’ to your project and drop the font files in there. Fonts can then be set the same way as textures were set for the GUI texture object. In the inspector, find the property ‘Font’ then click the circle to the far right, then select your font.
Step 7: Final Positioning
Unity gives you some options to position the Gui Text and Gui Textures individually. This I have found is a major pain in the ass. I found it to be easier and more intuitive to add both the text and graphic to a parent component, then to position that component. So lets to that.
Create an empty game object by selecting GamObject > Create Empty
Name this object whatever you like, I named mine ‘HUD_gems’ then drag your two gui objects onto the new empty object to make them a group
Now with the Parent object selected, change the X and Y coordinates in the Inspector tab to an appropriate position by referencing your Game tab.
Repeat the process for more HUD items. I will show how to script these items in an upcoming tutorial,
happy game making!
John







Indeed Gui texture placement is a pain.
I also use the empty object parenting
thanks and keep the tutos coming 🙂
Thanks for the visit Ben, Lets see how the new UI system in the upcoming Unity version will fare, looks promising so far! I’ll write about it soon.
stay tuned for more posts about games i’m working on.
Hi John,
Nice tutorial..I was having headache on this . It might “looks” simple to some, but easy in getting lost for newbie like myself. (I was lost while reading on the unity documentations…)
I’m eagerly awaiting for next tutorial.
Thanks John!
Thanks for your comment Carol, I made this particular tutorial as I had the same issue you describe with Unity’s docs. I will be doing a lot more unity tutorials in the comming weeks. Thanks for the visit!
Hello, im trying to do a folder, that contains 10 photos inside. Do u have a tutorial?
Hey mate, i’m having trouble with the GUIText not resizing when it changes the resolution. Do you have a solution for that? i’m tired of searching the internet and not finding a solution specificaly to using GUIText object instead of OnGUI.
Great site, Thanks for sharing!!
where is the code!