In this tutorial I will explain how to create a realistic looking smoke effects in Unity. It will be your typical upwards smoke, which is ideal for camp-fires, smoky car engines. Basically anything that burns. It’s also an effective way to simulate steam (for both 2D and 3D games).
Unity uses what is called the ‘Shuriken’ particle system which replaced an older system which is being phased out. The Shuriken system is much more robust and gives detailed control over particle emitters. But with any robust system, there are a lot of confusing settings and knobs and controls that one must get to know.
Lets get cracking, first up lets take a look at what we will be making. (Ignore the low frame rate, that’s just the GIF being ass.. It will look silky smooth in Unity).
1. Add a Particle System
A Particle System is a a Game Object that can be both added to an existing game object as a component, or added individually to the world. In this example we will just add it to the world on its own.
From the top toolbar select GameObject > Particle system
(all this does is automatically create a blank Game Object and adds the Particle System as a component of that object)
It should have some default settings so that whent he game object is selected, it will an upwards fountain of white circle particles. A decent base to get started with.
2. Set Base Values.
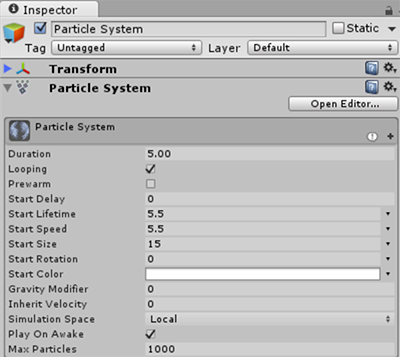
Select the Game Object which the Particle System is attached to, and in it’s inspector set the properties of the Particle System component to the those in the image below.
To summarize, we are asking the particle system to run a looping cycle with a lifetime of 5.5 second life span, a starting speed of 5.5 units, and a particle start size of 15 units.
3. Create the particle material
To have our puffs looking like actual smoke, we need to give the particles an image to use. Without an image we will be stuck with the default snow ball looking particles, which aren’t much fun.
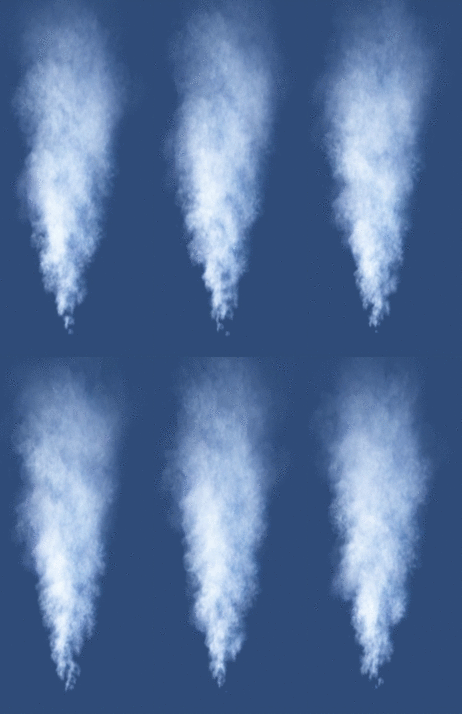
Save the image below and add it into your project folder. Don’t worry about the background being black, Unity will make it transparent.
Create a new material and add the image to it, as well as changing the Shader settings to Particles/Additive (Soft) as below (If you yet don’t know how to create a material, then you should be starting on some easier tutes!)
4. Set sub values.
Now that the base values are set and we have our image, we need to tweak the sub values to fine tune the shape, volume and motion of the particles and emitter. We will only be changing some of sub values as indicated below. Lets go from the top.
Emission:
This controls the rate at which particles are emitted as well as allowing creation of burst emissions (example: cloud puff when a player lands from a jump).
Clicking the (+) in the bottom right corner of this panel creates bursts which are great for explosions and smoke puffs, we will revisit the Burst feature at the end of the tutorial.
Shape:
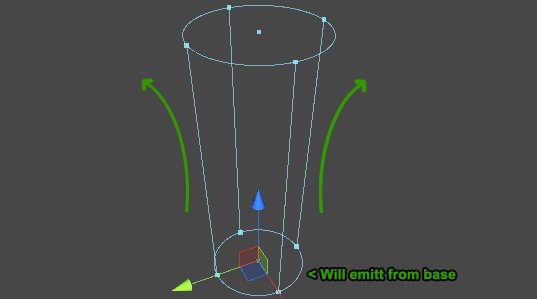
This defines the volume of the emitter, the staring position of the particles and the direction they should flow. Set the shape to ‘Cone’ and modify the angle and radius so that the upper ring is slightly wider than the lower. Make sure the emitter is set to create particles from the ‘Base’.
I encourage you to play with the shape to see how dramatically it can change. It might give you some nice ideas of different ways particles can be used in your games.
Colour over lifetime:
Controls the colour of the particles throughout it’s lifespan. For our smoke we want to particles to start white and fade out to nothing.
Click the color bar to open the editor then set the colour and transparency values as shown below.
Size over lifetime:
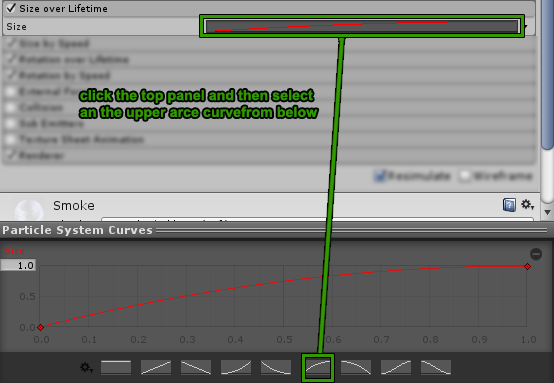
This controls the size over particle over its lifetime, in our case we want to particles to start small and increase over time in a nice gradual way.
Click the drop town arrow and make sure that its set to ‘Curve’
Now select the top panel which will open the curves editor, select the upper curve preset.
Size by speed:
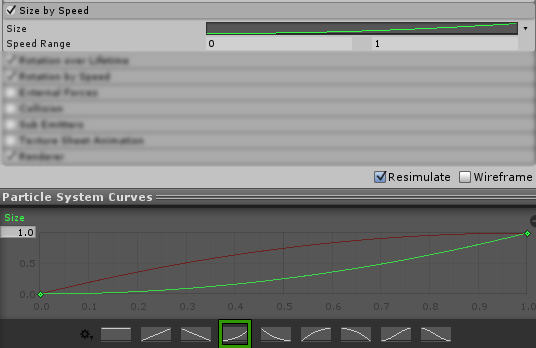
This controls the size of the particles based on their speed. As above, select the top panel and change the curve settings to be a lower arc. Try changing the ‘speed range’ values to see what happens.
Rotation over lifetime
This one is pretty important in selling our smoke effect.
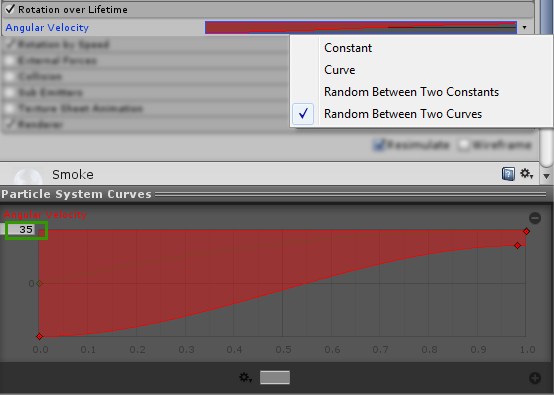
Unlike the previous settings, this one should be set to ‘Random between 2 curves’. You must then create points (right click add/remove pint) and pull at the handles to create a nice S-curve.
Set the ‘Angular Velocity’ to 35, this will determine how fast the particles spin.
Renderer:
Finally and most importantly we need an tell our Particle System what each particle should look like. For this wee need to give it an image/material which resembles a smoke puff. Thankfully we have already done that in step 2.
Grab your awesome Smoke material and drag it into the Material slot in the Renderer tab settings, then set the other sub values to the following.
If all has gone well you should have a pretty smoke emitter. please experiment with the scales speeds and emitter values to see what variations you can come up with.
5. Lets create a smoke puff
To demonstrate how just a few tweaks can create a different smoke effect, try tweaking the highlighted settings to match whats below to create a nice double smoke puff.
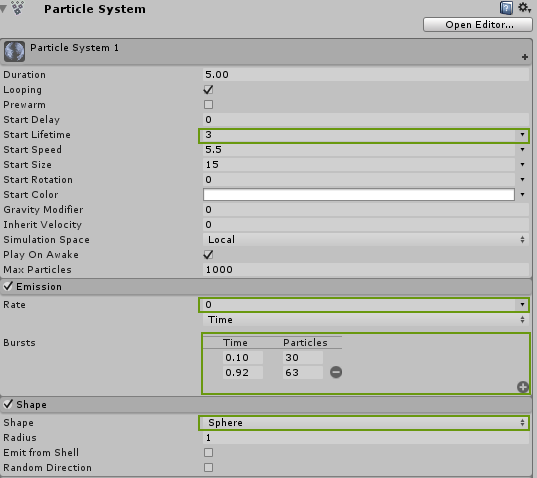 The effect will look something like this

Hopefully you will now have a better understanding of how the particle system works and can be used to dazzle. Playing with the values and experimenting is key!












Leave A Comment