I recently started serving Admob ads for a new mobile game I’m working on. The complexity while be be influenced by the the NativeExtension used. In my case I used the extension from Milkman games, I highly recommend their Native Extensions – and though not free, they are reasonably priced, well documented, and provide updates and good support.
There are several steps which you have to go through before you can start servind ads, including setting up an admob account. Some of these steps may seem complicated the first time around, so hopefully Hopefully I can my guide can get you going. I will not be explaining how to use any specific NE, or providing support for said NE, for that you will need to go to the vendor.
Step 1: Choosing a Native extensions
You have limited options here.
- You can spend a lot of time writing and testing your own NE, and watch it break with every new AIR version.
- You can buy the extension from MilkMan games and enjoy the well documented example project.
- You can grab one of the free (and possibly buggy)NE’s floating around forums with no documentation or support, and scratch your head for X amount of hours before you decide going for step 2.
Step 2: Create an Admob account
Here you have the option of signing in with your google account (admob is owned by google).
This is convenient, although you may run into conflict as to which account you use. Admob uses adsense to manage income, and google only allows one adsense account per person.
This might be an issue for some people who have have (like me) different google play and adsense accounts. I have limited knowledge of such possible conflicts, but just be aware that it might be a bridge you have to cross at some point.
During the signup process you may be asked if you are an ‘advertiser’ or ‘publisher’ or both. As you will likely be using admob to promote your own app as well as making money, select both.
Step 2: Setup a new app in the Admob dashboard
Once you have signed into Admob navigate to Sites & Apps > Add Site/App
Then select the platform you will be using, In our case we want Android.
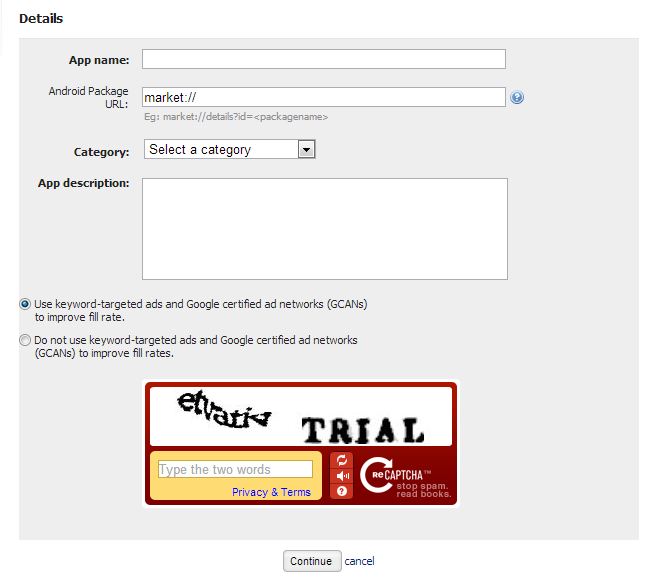
Fill out the details for your app. If your app is not yet in the appstore, set the ‘Android Package URL’ to ‘http://’ (without quotes), otherwise type your app store listing url/id
Inside the constructor in the NE example class you will find method AdMob.init() . paste in the Publisher ID you copied from the previous step
// for the AdMob for Android or AdMob for iOS Extension:
AdMob.init(“Your publisher ID here”);
When your app is setup in Admob it should appear like below (ohh sexy dollar signs …. ) this is where you will be tracking ad impressions and income.
Step 3: Setup your Native Extension
Before we jump to out AIR project, we need to get the ‘publisher id’ which will need to be added to our project.
To do so hover over the app listing in the admob dashboard and you will see an option to ‘Manage Settings’ click it.
Copy the publisher ID to the clipboard
Use the example project that comes with the MilkMan NE and open the example class.
In the Constructor of the example class there will be a call to Admob.init()
paste the publisher ID from the previous step as a parameter
		// for the AdMob for Android or AdMob for iOS Extension:

		AdMob.init("your publisher ID here");
***NOTE*** MAKE SURE YOU HAVE ADDED THE ANE TO YOUR PROJECT, THIS WILL CHANGE DEPENDING ON HOW YOU ARE COMPILING. IF YOU CANT WORK THIS OUT YOU SHOULDN’T BE PUBLISHING APPS YET!
The next and final step is to modify your app descriptor file (xml that is generated and bundled with your AIR app, it should be in your bin folder)
The important additions you need to add are:
 <android>
        <manifestAdditions>
      <![CDATA[
			<manifest android:installLocation="auto">

				<uses-permission android:name="android.permission.INTERNET"/>
				<uses-permission android:name="android.permission.READ_PHONE_STATE"/>
				<uses-permission android:name="android.permission.READ_NETWORK_STATE"/>
				<uses-permission android:name="android.permission.ACCESS_NETWORK_STATE"/>

			    <application>

				<!-- AdMobActivity definition -->
				<activity android:name="com.google.ads.AdActivity"
				android:configChanges="keyboard|keyboardHidden|orientation|screenLayout|uiMode|screenSize|smallestScreenSize"/>

				</application>
			</manifest>
		]]>
    </manifestAdditions>
    </android>
and the extension link. If you are using flash to publish, it should be added automatically
  <extensions>
    <extensionID>com.milkmangames.extensions.AdMob</extensionID>
  </extensions>
Your entire xml file structure should look something like this, the only values relevant to the admob extension are the ones mentioned above.
<?xml version="1.0" encoding="UTF-8" standalone="no" ?>
<application xmlns="http://ns.adobe.com/air/application/YOUR AIR VERSION">
  <id>com.yourdomain.yourappname</id>
  <versionNumber>1.0.0</versionNumber>
  <versionLabel/>
  <filename>test</filename>
  <description/>
<!-- To localize the description, use the following format for the description element.<description><text xml:lang="en">English App description goes here</text><text xml:lang="fr">French App description goes here</text><text xml:lang="ja">Japanese App description goes here</text></description>-->
  <name>test</name>
<!-- To localize the name, use the following format for the name element.<name><text xml:lang="en">English App name goes here</text><text xml:lang="fr">French App name goes here</text><text xml:lang="ja">Japanese App name goes here</text></name>-->
  <copyright/>
  <initialWindow>
    <content>YOUR_SWF.swf</content>
    <systemChrome>standard</systemChrome>
    <transparent>false</transparent>
    <visible>true</visible>
    <fullScreen>true</fullScreen>
    <aspectRatio>landscape</aspectRatio>
    <renderMode>gpu</renderMode>
    <autoOrients>true</autoOrients>
  </initialWindow>
  <icon>

  </icon>
  <customUpdateUI>false</customUpdateUI>
  <allowBrowserInvocation>false</allowBrowserInvocation>
 <android>
        <manifestAdditions>
      <![CDATA[
			<manifest android:installLocation="auto">

				<uses-permission android:name="android.permission.INTERNET"/>
				<uses-permission android:name="android.permission.READ_PHONE_STATE"/>
				<uses-permission android:name="android.permission.READ_NETWORK_STATE"/>
				<uses-permission android:name="android.permission.ACCESS_NETWORK_STATE"/>

			    <application>

				<!-- AdMobActivity definition -->
				<activity android:name="com.google.ads.AdActivity"
				android:configChanges="keyboard|keyboardHidden|orientation|screenLayout|uiMode|screenSize|smallestScreenSize"/>

				</application>
			</manifest>
		]]>
    </manifestAdditions>
    </android>
  <supportedLanguages>en</supportedLanguages>
  <extensions>
    <extensionID>com.milkmangames.extensions.AdMob</extensionID>
  </extensions>
</application>
Step 4: Test your app
You can plug your android mobile into your computer and use Flash cs6’s awesome ‘install on connected device’ feature, alternatively you can publish and upload your APK to google play.
This step is beyond the scope of this tutorial. But is it assumed you have an existing google play account and are familiar with the upload process.
If all has been setup correctly( and you are using the example project from milkman correctly) you should start seeing ads.
Any questions on project integration, check out the documentation with that comes with the ane.
If you would like some more info on any of the steps, feel free to drop a response, or email me johnstejskal@gmail.com and I will help you out. Good luck and god speed.


Just signed up, the admob website looks different from your screenshots.. did they just change it a few days ago??