This post is part 2 of Understanding and Creating 2d Animation State management in Unity3d, In this tutorial we will be continuing from Part 1 and covering the following topics:
Adding the player component
Adding an animation State Manager to the player
Defining Animation transition rules and parameters
Switching between animations at runtime
Ok so lets get started:
In the last step of part 1 we left off by creating several player animations, walk, crouch, hadooken, idle and jump by dragging sprite sequences into the scene view.
If these animations exist in your scene view, remove/delete them so that the main camera is the only component left.
Creating the Player Component
Create a new empty game object that will be used for the player. ‘GameObject > Create Empty’ and rename it to Player.
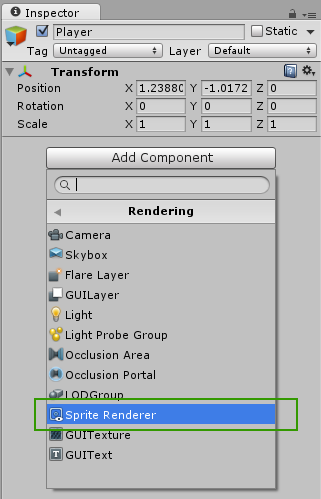
As the object is invisible, we will want to add a Sprite Renderer to it, so that we can can actually see something in the scene view. This is not however related to the animation states. It simply gives us an on-screen representation of the player so we arn’t moving around an invisible object.
To do so, select the player in the hierarchy panel and then click ‘Add Component’ in the Players Inspector panel, click on ‘rendering’ in the drop down, which will open a new tab, from which you can now select ‘Sprite Renderer’.
After adding the the Sprite Renderer component you will need to tell the Sprite Renderer which Sprite to use (it can accept only one sprite).
In our example I will use one of the sprites from the Idle animation. There are two ways we can go about this.
Drag the sprite from your project panel to the Component panel
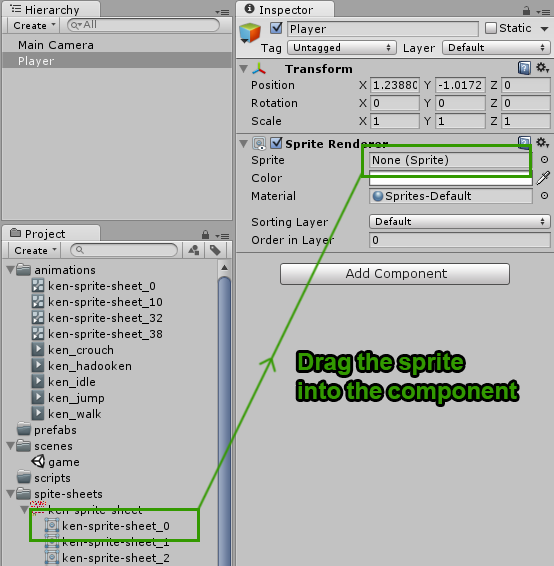
Alternatively if you want a visual aid, you can open the asset panel and visually select an appropriate asset.

You will now have a Sprite attached to your Player and visible in the scene, amaze-balls.
Add an Animator to the Player
The Player object needs an Animator component to manage the players animations.
In the Player’s Inspector panel, click ‘Add Component’ then select ‘Miscellaneous > Animator’. You will now find an Animator component assigned to the Player, observe that it accepts a parameter for ‘Controller’.
The controller will tell the animator what animations should be shown and when, so lets now create the Animation Controller.
Create the main Animation Controller
To control the different animations Unity3D has a freaking cool feature called the Animation Controller. It is a state manager which lets developers visually assign animation states and define rules which control when and how they play. It is essentially a Policeman in the middle of an intersection ‘controlling’ the flow of traffic based on specific road ‘rules’.
In the Project panel, right click on the animations folder we created previously and select – ‘Create > Animation Controller’. This will have added ‘New Animation Controller’ into the folder, Rename it to something more appropriate like ‘PlayerAnimationController’.

When we created our individual animations previously, Unity most likely created animation controllers for each one (in the same folder), we will not be needing those, delete them so that we are left with just the new Animation Controller we created.
Understanding and organizing the Animation Controller
So here comes the FUN part, hodor hodor..
Double click the newly created Animation Controller to open the animator tab, then drag all your animations into it.

The Animation Control deserves its own tutorial as there are many features and interesting aspects (I’ll write an in-depth guide later). I will however try to keep this tutorial slim and stick to just the bare essentials to get our player moving/animating.
Organise Your Animations
Mouse drag your animation states so they are layed out in a neat way so can map transition links between them (you can pan around the animator view with the middle mouse button). there is no real rule for this process and it will likely vary from game to game depending on how many animations you have – and how they work together. With practice you will get used to finding nice layouts quickly. In our current tutorial you can try something like in the image below
Set the default animation
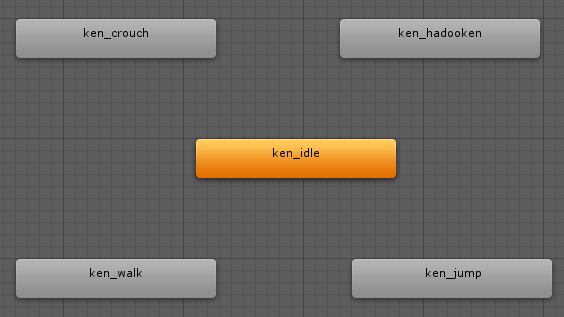
The Animator needs to be told which animation should be treated as ‘default’. The default animation will be the first one that plays when the player is shown in the game. This will change from game to game depending on your requirements. In our current case we want the Idle animation to be our default.
Right click the Idle Animation in the Animator view and select ‘Set As Default’ this will change the colour of the animation to orange.
Map the Transitions between animations
At the core of the Animation Controller is the power to map transitions between animations.
Right click the Idle animation and select ‘Make Transition’. This will create an on-screen arrow which needs to target another animation. Try targeting Walk.
Then right click the walk animation and create another transition link back to the idle animation.
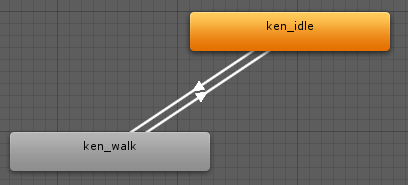
What this essentially means is that in our game, the walk animation can be played from the idle animation and vice versa. Makes sense? No? Consider this then. If our player is Crouching and wants to Jump, he must first stand (Idle), similarly, if he wants to Crouch, he cannot be Jumping in the air. It is important that you think carefully about the animation rules you want to apply to your character to create a responsive game. Many 2D games may be as simple as Run and Jump. Fighting games are possibly the most complicated.
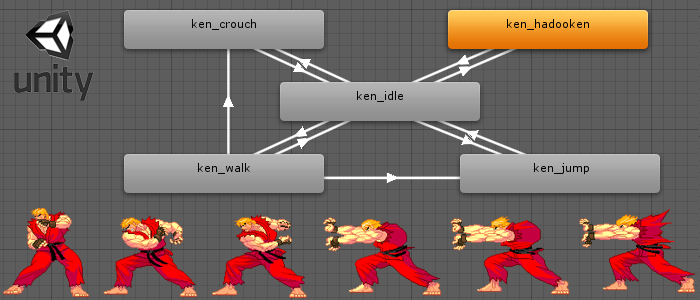
When our Animation transitions have been mapped, our network should look something like this image:
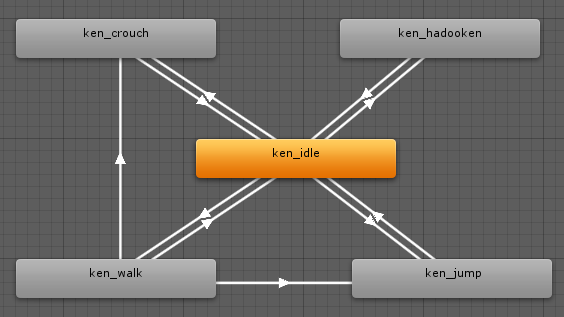
Take your time to consider the relationships. Some observations: Ken can execute any animation if he is idling. Ken can do a hadooken from only the Idle state, he cannot however hadooken from the air, while crouching, or while walking.
Defining Animation ‘Parameters’
This will be the final step (and possibly the most complicated) I will be following with a part 3 covering scripting up keyboard controls to tap into the state manager we have created.
In the Animator window, you will notice there is a tab labelled ‘Parameters’ in the bottom left corner. This component allows us to add numerous custom parameters which instruct our player when one animation should transition to another.
For this tutorial we will be adding a Parameter called “state” which will be an Integer representing each of the animation states we have created. This state parameter will later be changed at run-time based on user input
It will make more sense to see it in action, so lets start by adding the state parameter
Click the ‘+’ symbol on the parameter panel and select ‘Int’ (Integer), then give the parameter the name ‘state’.

Setting Transition Conditions
Now that we have our ‘state’ parameter created we can tell our animations to listen to it and transition according to the value.
This process can be a little tedious and will need need a bit of real time checking later on to make sure its all working correctly.
First of all we need a key to match up which values go with which state, we will also later use these values when writing our player controller code (part 3).
ken_idle = 0
ken_walk = 1
ken_crouch = 2
ken_jump = 3
ken_hadooken = 4
Now we need to click on each transition in the Animator window (white arrows) and map our state property to it.
Alternatively you can click the actual animation rectangles to see the list of transitions connected to that state (in the inspector tab) and clicking them.
Start by selecting the transition link from ken_idle to ken_walk.
Doing so will bring up the following details in the inspector tab. It may look a little daunting, but for now we can ignore most of the information.
One thing to note is the ‘Atomic’ check box which is checked by default. When Atomic is checked the transition between the 2 animations listed cannot be interrupted. We will come back to this later if required, but for now you can leave it checked.
Note ** Sometimes the contents of of this tab when selecting transitions doesn’t show correctly, if you can’t see the ‘conditions’ try re-sizing the tab.

The ‘Conditions’ sub tab is where we define WHEN this transition should take place. By default will be set to ‘Exit Time’, this essentially means: when the ken_idle animation finishes playing, automatically play the ken_walk animation (if you run the scene you should see this in action, ken walks, then idles continuously).
Change the values to look like this:

This tells Ken, if idling, to play the walk animation IF the state parameter changes to 1 (we will change this parameter at run-time using the keyboard).
Now go through all the other transitions and set the states based on the key values I listed previously.
ken_idle to ken_walk when state equals 1
ken_idle to ken_crouch when state equals 2
ken_idle to ken_jump when state equals 3
ken_idle to ken_hadooken when state equals 4
ken_walk to ken_idle when state equals 0
ken_walk to ken_crouch when state equals 2
ken_walk to ken_jump when state equals 3
ken_crouch to ken_idle when state equals 0
ken_jump to ken_idle when state equals 0
ken_hadooken to ken_idle when Exit Time
Changing animation states at run-time
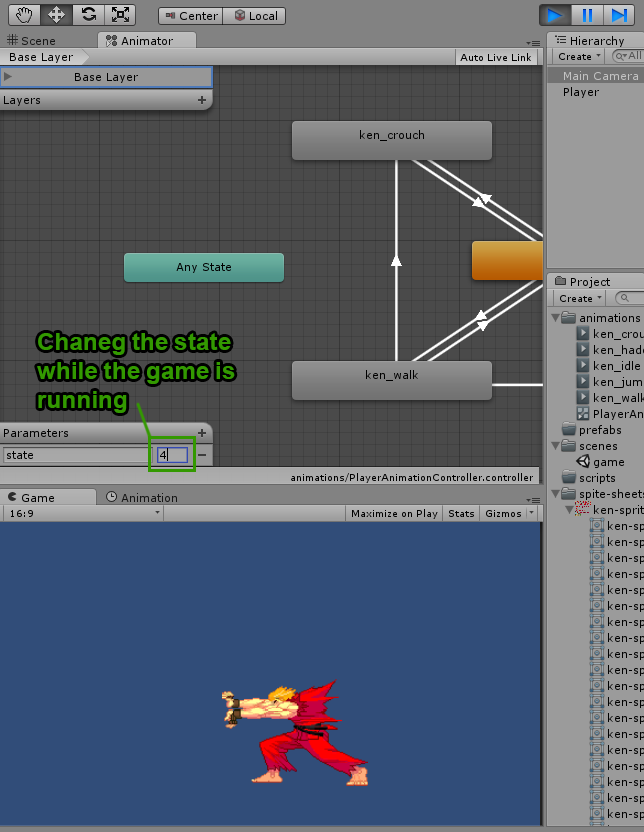
Because Unity3d is so awesome, it gives us the ability to review these state changes in real-time without the need for keyboard input (we will cover that in Part 3).
Simply run the scene and change the parameters value in the Animator window to whichever state you want to see and watch the magic happen, you may need to change your window layout to see all the relevant panels.
So that’s it for Part 2, In part 3 I will be covering user input via the keyboard and linking it to the State Manager.
I would love to have covered the player controls in this post but it’s just way too long and crosses too many sub topics.
Hopefully this tutorial has given all the info required to get some animations changing.
Join me on Patreon to get exclusive access to source code and valuable gamedev info.


Hey! Nice tutorial, but most intresting part will be 3, cant wait for it 🙂
Thanks for the interest Alex, i will finish part 3 this weekend. Been too busy at work 🙁
This tutorial is awesome, and I really appreciate it! Something that I might have missed is that when you create the PlayerAnimationController, it should be dragged onto the Controller parameter in the Animator component of the Player object. That way you can see all the animations 😉
thanks for the kind words Nathan!
Hey awesome tutorial man! Looking forward to part 3!
very good example, i am excited for chapter 3.
Part 3, coming in time for Christmas??? 🙂
ahahaha! yeah man, It’s been a super busy end of the year for me commercially so i have not been able to give my blog and readers the love they deserve. Will look at finding time over the xmas break to wrap this series up!!!! 🙂
Thanks john
where is Part 3?
Playing around here. When the crouch state “finishes”, I’d like it to keep using the last frame… or should it go on to another “crouching” state? He just keeps on crouching up and down…
Hi, try selecting the ken_crouch animation from the project window, then in the inspector make sure ‘Loop Time’ in unchecked. I’ll be fixing up some of this stuff shortly. cheers
Hi, i have a little problem with the hadooken. When you do the hadooken animation it have to get back to the iddle animation when the hadooken finishes right? Because of the exit time paramater. But with me this isn’t happening, the hadooken just repeat it self(i tried to make the Loop Time uncheked but it still the same). Do i need i script for that or i’m just missing something?
PS: Sorry for the bad english, nor my first language.
I’m not sure, as there are a few things that could lead to that result. If you are still having the issue, download the finished project at the end of tutorial 3 and compare. all the best.
[…] Unity 2D Animation: Creating the Actual Animations. Creating 2D animation states in Unity3D : Part 2 – Understanding the Animation Controller. Game Development with Unity 2D – part 3: GUI, or No Text is an Island – Design a Game. Unity 4.3 […]
[…] Creating 2D animation states in Unity3D : Part 2 – Understanding the Animation Controller […]
Big problems with unity 5 !! my ” haduken ” sprite do not return to Stand Animation i didnt make like ” State” i put if atack true, and exit time dint work ,… =[[[[[
Yeah, I’m sorry about that. Unity’s 5.0 update has busted parts of this tutorial. I’m in the process of fixing it and the sample project.
Thanks. This tutorial is very helpful for me 🙂
Great tutorial, but I think the animator parameters should be used in another way. The idea is to hide the whole state-logic from scripting by defining the states and transitions in the Animator. The parameters should be thought of something like the “attributes” of the character. Like “speed”, “grounded” or “attack”. So in the script you just set the right parameters and the animator will handle the animations, like when you hit the jump button you throw the player in the air and call animator.setBool(“grounded”, false); (for example) and when you have set the transition conditions in the animator, it will automatically fade to the corresponding animation states. 😀
epic